Thursday, 31 January 2013

How to Change Time to Date Below Post Title in Blogger?


how to change time in bloggerThe Blogger custom templates are designed by different designers from around the world. Many out of these templates are coded by professional designers and they are good from all prospective's  But indeed, there are also many poor coded templates are there. Unprofessional templates sometimes create troubles for newbies who want to easily customize their design with their own needs. So therefore, you must select a well-coded template for your blog. However, today I will let you know about changing your blog time which appears exactly after post titles in blogger. There should be date and author name instead of time alone. But in most blogger custom templates only time is published with author name. So we will change this respectively. 


before going straight to the tutorial please have a look at below image when the time after post titles in Blogger appears


This appears because the designer has set the time with author name in their custom template. So it isn't good for SEO, we will have to change it to date. our blog's template devil's workshop had also time with author name, so we promptly changed that.


How to replace time to date in Blogger?

Now the process is quite simple and you just need to replace a single word with another one, follow given steps in order to do so: 
  1. Log-in to Blogger Dashboard
  2. Template >> HTML >> Proceed >> Check the Expand Widget Templates
  3. Now carefully search for this code
<data:post.timestamp/>
Just replace the above code with below one:
<data:post.dateHeader/> 
Save your template and you've changed time into date for all of your posts. Now your look after post title will be like below image:


Tuesday, 29 January 2013

How to add Simple Email Subscription Box in Blogger?


Email subscription box is necessary for each and every blog. Because if you want to doblogging for a long term or want to engage your business with your blog then you must consider creating a list of people who want to subscribe to your blog and updates. Via the email subscription box people get interested in your blog content and if they want to be updated by you, they put their email in the box and subscribe to your RSS feeds. We can easily add an email subscription to any website or blog.

Commonly, webmasters use Google Feedburner tool for this purpose. Feedburner is a Google's tool which enables visitors to subscribe to your blog via their email box and other tools. While adding the email subscription box to your blogger blog is the easiest thing ever. Because, Feedburner and Blogger both belong to Google. In Blogger, simple email box can easily be added into your blog, because your feedburner is linked to blogger and it automatically creates RSS address for you.

Now let's start adding your simple email box to your blog.


How to add simple follow by email box to your blog?

There are two ways you can use to add an email subscription box to your blogger blogs. The first method is adding a box directly from Feedburner account and the second one is adding it from blogger's widget library. So in this tutorial we'll just add it from Blogger library itself. Follow given tips:
  1. Blogger >> Layout >> Add A gadget [Shown in Picture]
In above picture you can clearly see the indicated areas from where first you'll add a gadget and inside that just scroll down and you can find the Follow by Email widget, hit the plus (+) button and it will take you to another page as showing in below picture:

In above screen shoot you can observe, my feed address has automatically been created for my blog BBC. I will just press the save button and it will be added to the side bar and will be looking on my blog like below image:
Now your email subscription box is ready and any visitor who will like your content, will subscribe for future updates.

Sunday, 27 January 2013

Change Older Posts, Newer Posts Links to Buttons in Blogger


By default blogger template setting is very simple and normal. So, if you want to make your blog more fancy and professional in design then you'll have to learn many things for doing so by yourself. In blogger blogs, you can see the Older posts andNever posts links below all posts. That has been set by Blogger for default templates. So if you want to change them to some shiny and beautiful buttons like my blog; then you are here to learn the procedure. Steps are very simple and you will make older and never posts like our buttons.


How to Change Older & Never Links to Buttons in Blogger?

Start the procedure by following below steps:
  1. Log-in to Blogger dashboard 
  2. Go to Template >> HTML >> Check the Expand Widget Template
  3. Now search for below code (tip: use CTRL+F)
<data:newerPageTitle/>
Replace it with this code below:
<img src="Img-Url-for-previous-button"/>
Again search for this code:
<data:olderPageTitle/>
Replace it with this one below:
<img src="Img-url-for-next-button"/>
Once Again search for this code:
 <data:homeMsg/>
The above code may appear twice, so both times replace it with below code:
<img src="img-url-for-home-button"/> 
Now save your template and you've done almost all steps :-) 

but do remember to change the img tag URL with your button image URL. You can first download my images at the top of this post or can download similar buttons from the internet. After downloading button images to your PC, create a new post on your blog and upload images to that; make that post as your draft post. So, you can always upload the other images to that post and then can include in different places on your blog. You'll just have to copy the URL link of that image or the image itself from draft post. That's all.

How to Remove "Powered By Blogger" Attribution from Blogger?


As many of you know that Blogger is completely developed in XML (Extensible Mark Up Language). Blogger has its own XML codes which you can use to add elements or to remove elements. Those who make Blogger templates must know XML. There are many attributes or links on default blogger templates which sometimes people don't want to see on their blogs. And one out of those links is "Powered By Blogger"Attribution which appears in every blogger default template at the footer. You can see the attribution link in Below picture. So today, we will find the easiest and quickest way to remove this link.

remove powered by Blogger4
When you visit your blog the above attribution appears mostly in footer also it appears at left sidebar on some templates. You can find its widget by visiting blog layout page and there you will see its widget with a name of Attribution. [See below screen shoot for Example]


remove powered by Blogger3


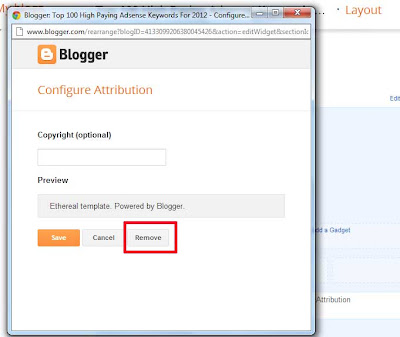
In above picture when you click the edit button, a box appears same as showing in below picture. You can observe; there is no removable link for this widget. But we will make it removable after some changes in our template HTML section. continue reading the article.
remove powered by Blogger1


How to Remove "Powered By Blogger" Attribution from Blog?

A simplest method is being shared here to remove Blogger default attribute from any of your blog. So follow the few steps and get rid of this:

  1. Log-in to Blogger Dashboard
  2. Template >> HTML >> Proceed >> Check Expand Widget Templates
  3. Now search carefully for this code Attribution1 
  4. Near Attribution1 you will find this code: locked="true" 
  5. Just change the true value to false
  6. Save your template and all steps are done! [see the screen shoot below for example]

remove powered by Blogger
After doing all above steps, come back to the blog Layout page and edit that widget which didn't have the removable button before, now it will be having removable link and if you want to remove it then click button and remove it. You will no longer see this attribution on your blog. [see the image below for example]
remove powered by Blogger

Friday, 25 January 2013

How to Remove "Subscribe to: Post Atom" Link from Blogger

In Blogger, there is a link namely "Subscribe to: Post (Atom)" which appears below every post sometimes at left side or at center. It also appears on Blog'e home page. By clicking this link a visitor can subscribe to your RSS feeds. but instead of this unnatural link, there are many other awesome ways to give visitor the opportunity to subscribe to your blog feeds.


Mostly people, especially new blogger users dislike this link. They want to make their blog more beautiful and shiny. So and therefore, they want to remove this link as quickly as they find a solution for it. There are many tricks have been shared on the internet about this issue. But the one I'm going to share, is the easiest method to remove this link from your blog. Let's now come straight over the way.

How to Remove Subscribe to: Post (Atom) Link on Blogger?

You can remove this link by using many tricks, but this is the simplest & quickest method, because by using this method we will just hide it from our blog by using CSS property. You'll have to add just one single CSS line to your blog's style sheet and that's all. Now follow the steps to do this:
  1. Log-in to your blog
  2. Template >> HTML >> Proceed
  3. Search For this code ]]></b:skin> (tip: Use CTRL+F)
  4. Now Just above/before ]]></b:skin> insert following code
.feed-links { display:none !important; }
Save your template and view your. Feed Atom link no longer be there.


LG Mobile tricks

LG all models test mode:
Type 2945#*# on the main screen.
2945*#01*# Secret menu for LG
IMEI and SW (LG 510): *#07#
Software version (LG B1200): *8375#
Recount cheksum (LG B1200): *6861#

Factory test (B1200): #PWR 668
Simlock menu (LG B1200): 1945#*5101#
Simlock menu (LG 510W, 5200): 2945#*5101#
Simlock menu (LG 7020, 7010): 2945#*70001#
Simlock menu (LG 500, 600): 2947#*

LG-U81XX SPECIAL CODES
Code to read phone version :


- Phone without SIM
- Enter 277634#*# or 47328545454#
- Select ‘SW Ver.info’
Code to reset phone :
- Phone without SIM

- Enter 277634#*# or 47328545454#
- Select ‘Factory Reset’

Code to enter UNLOCK MENU :
- Phone wit SIM inside
- Enter 2945#*88110#
Test Menu 8330 : 637664#*#
Test Menu 8180 V10a: 49857465454#
Test Menu 8180 V11a: 492662464663#
Test Menu 8130-8138: 47328545454#
Test Menu 8110-8120: 277634#*
LG all models test mode:

Type 2945#*# on the main screen.
2945*#01*# Secret menu for LG
IMEI and SW (LG 510): *#07#
Software version (LG B1200): *8375#
Recount cheksum (LG B1200): *6861#
Factory test (B1200): #PWR 668
Simlock menu (LG B1200): 1945#*5101#
Simlock menu (LG 510W, 5200): 2945#*5101#
Simlock menu (LG 7020, 7010): 2945#*7000
1#
Simlock menu (LG 500, 600): 2947#*


LG-U81XX SPECIAL CODES
Code to read phone version :
- Phone without SIM
- Enter 277634#*# or 47328545454#
- Select ‘SW Ver.info’
Code to reset phone :
- Phone without SIM

- Enter 277634#*# or 47328545454#
- Select ‘Factory Reset’

Code to enter UNLOCK MENU :
- Phone wit SIM inside

- Enter 2945#*88110#
Test Menu 8330 : 637664#*#
Test Menu 8180 V10a: 49857465454#
Test Menu 8180 V11a: 492662464663#
Test Menu 8130-813
8: 47328545454#
Test Menu 8110-8120: 277634#

========


Wednesday, 23 January 2013

Manual GPRS/EDGE Settings for Mobilink, Telenor, Ufone, Warid, Zong


You don’t want to call again and again to Help Line for getting the MMS or GPRS settings for your handset? Or you have the settings but you doubt they are correct. Many of TechReaders.com readers email me and ask me the details of MMS/GPRS settings for their mobile operators. I thought; why not provide details for all operators. This article will guide you with step by step process of activating MMS or GPRS for different networks in Pakistan i.e. Mobilink, Telenor, Ufone, Warid, and Zong. Let’s start with Mobilink.
Following details are for manual GPRS/MMS settings but you can always get settings by either calling help line or sending SMS. I would recommend help line option because you get the settings instantly. In case of SMS request, it could take up to 24 hours.


MOBILINK HTML/GPRS/MMS SETTINGS

Mobilink Logo
  • HTML Setting
Connection Namea. For Postpaid: Mobilink Connect
b. For Prepaid: Jazz Connect
BearerGPRS
Homepagewww.mobilinkworld.com
Access Point Namea. For Postpaid: connect.mobilinkworld.com
b. for Prepaid: jazzconnect.mobilinkworld.com
WAP Proxy (IP) address
Usernamen/a
Passwordn/a
Session typeContinuous / permanent
SecurityOff
AuthenticationNormal
  • MMS Settings
Connection NameMMS
BearerGPRS
Homepagehttp://mms/
Access Point Namea. For Postpaid: mms.mobilinkworld.com
b. for Prepaid: mms.mobilinkworld.com
Gateway/WAP Proxy/
Proxy (IP) address
172.25.20.12
Usernamemobilink
Passwordmobilink
Session typeContinuous / permanent
SecurityOff
AuthenticationNormal
  • GPRS Settings
Connection Namea. For Postpaid: Mobilink WAP
b. For Prepaid: Jazz WAP
BearerGPRS
Homepagehttp://wap.mobilinkworld.com
Access Point Namea. For Postpaid: wap.mobilinkworld.com
b. for Prepaid: jazzwap.mobilinkworld.com
Gateway/WAP Proxy/
Proxy (IP) address
172.24.97.29
Usernamemobilink
Passwordmobilink
Session typeContinuous / permanent
SecurityOff
AuthenticationNormal

Telenor GPRS/WAP/MMS Settings

Telenor Logo
  • Telenor GRPS Settings
    • Access Point Name (Apn)/Node: internet
    • Login/Username: Telenor (case sensitive)
    • Password: Telenor (case sensitive)
    • Prompt Password: No
    • Authentication: Normal
    • Homepage: http://www.telenor.com.pk
  • Telenor WAP Settings
    • Access Point Name (Apn)/Node: wap
    • Login/UsernameTelenor (case sensitive)
    • Password: Telenor (case sensitive)
    • Wap Gateway Ip: 172.18.19.11
    • Port (If Required) : 9201
    • Port (If Required For Http Handsets): 8080
  • Telenor MMS Settings
    • Access Point Name (Apn)/Node: mms
    • Login/Username: Telenor (case sensitive)
    • Password: Telenor (case sensitive)
    • Wap Gateway: IP 172.18.19.11
    • Port (If Required): 9201
    • PORT (IF REQUIRED FOR HTTP Handsets): 8080
    • Relay Server/ Messaging Server: http://mmstelenor or http://172.18.15.1
Alternatively you can get these settings via SMS. For example for Nokia 6300;
For GPRS Internet
Write “Internet Nokia 6300” and SMS it to 131.
For WAP
Write “wap Nokia 6300” and SMS it to 131.
For MMS
Write “mms Nokia 6300” and SMS it to 131.

UFONE GPRS/MMS SETTINGS

Ufone Logo
  • UFONE GPRS Setting
    • Connection Settings
    • Setup a new connection:
    • Access points>
    • Connection name: UfoneGprs
    • Data Bearer: Packet Data
    • Access point name: ufone.pinternet
    • Username & password: ufone
    • Prompt Password: NO
    • Authentication: Normal
    • homepage: wap.ufone.com
    • Options>Advanced settings> Set your phone IP address? Automatic
    • Now Go to Connection settings Again>Packet Data> Access Point> ufone.pinternet
  • UFONE MMS Setting
    • Connection Settings
    • Setup a new connection:
    • Name is: “UfoneMMS”
    • Connection Name: Ufone.mms
    • AccessPoint: ufone.plmms
    • Everything else: default
Alternatively you can get settings either by calling Help Line or sending SMS to 222
[manufacturer<space>model] and send it to 222
Let’s say your Handset is Nokia 6300, text message would be
[Nokia<space>6300] and send it to 222

WARID GPRS/MMS Settings

Warid Logo
  • Warid GPRS Settings
    • Connection Name: Warid
    • Data Bearer: GPRS
    • Acces Point Name: wap.warid
    • User Name: N/A
    • Prompt Password: N/A
    • Password: N/A
    • Authentication: Normal
    • Homepage: http://wap.google.com
    • Advance Settings
    • Phone IP Address: Automatic
    • Primary Name Server: 0.0.0.0
    • Second. Name Server: 0.0.0.0
    • Proxy Serv. Address: 010.004.002.001
    • Proxy Port Number: 8080
Warid MMS Settings
    • APN: mms.warid
    • Username:
    • Password:
    • (Username and password are blank for Warid Pakistan mms settings)
    • MMSC: 10.4.0.132/servlets/mms
    • MMSC Proxy: 10.4.2.1:8080
    • MMS Max Message Size:
    • MMS UA Prof URL:

ZONG GRPS/MMS SETTINGS

Zong Logo
  • Zong GPRS Settings
    • Account name: zong
    • Access point: zonginternet
    • User name: (not require leave blank)
    • Password: (not require leave blank)
  • Zong MMS Setting
    • MMSC Center: http://10.81.6.11:8080
    • Account name: zongmms
    • Access point: zongmms
    • proxy: http://10.81.6.33
    • Port: 9201
  • Request Settings from SMS
Write “All<Space>Make<Space>Model” and send it to 131. For example, if you have Nokia 6300 you will write: “All Nokia 6300” and send it to 131
All<Space>Make<Space>Model and send to 131 (All Nokia 6300-> send it to 131)
If you need only GPRS settings then write an SMS as following
Internet<Space>Make<Space>Model and sent to 131
In case you don’t need GPRS or WAP and only want MMS, then follow this
MMS<Space>Make<Space>Model and sent to 131
Similarly, for only WAP setting on Zong number
WAP<Space>Make<Space>Model and sent to 131
Step 2: Once you send any of above given message, you will receive setting in an SMS. Save this SMS and you are done.
Hope that helps!