Saturday 23 February 2013

How to Change Facebook Login Background


The traditional Facebook login screen is very boring and monotonous since it took a long time with no changes. Maybe Facebook have forget about changing that Background Screen or even a little changes. Now you can change the Facebook Screen Background to any Picture that you want to put, using a very simple method. This trick is about aChrome Extension that will help you do that with few clicks.


How to Change Facebook Login Screen Background Picture

1) First of all, Go to FB Refresh Chrome Extension.
2) Click Add to Chrome, then confirm by clicking Add button.
3) After adding the plugin to Google Chrome, Go to  chrome://chrome/extensions/   to access all Chrome extension settings.

4) Now scroll down until you find the installed extension (FB Refresh), then Click Options just below it.


5) When you click Options, you'll be redirected to settings page of FB Refresh.
6) Under Image URL/Upload section you can paste the Image URL that you can find on Google Image Search or simply Upload an image of you.


7) You can also customize some other settings (Repeat X/Y, Size...) if needed.
8) After that, you have to Click on Save button in the bottom of the page.
Done! Now you can visit Facebook and notice the new Background that looks very stylish.

Friday 22 February 2013

How to Create new Partition without Formatting a Hard Disk


 If your Hard-disk contain 3 partitions in your PC and you need to create 1 more partition then what will you do? Most of people are doing the following methods to create new partition in Hard-disk.

Format the Hard-disk and create a new partition. Let’s see an easier method to create a new partition without formatting a Hard-disk.


To do this we don’t need any software and also no need to copy the data to separate drives. By doing the following methods we can create a New Partition from System Drive.

Right Click on My Computer 
Click Manage 
Now “Computer Management” window will appear.

In that window Click Storage 
Then select Disk Management.

In that window Hard-disk and other Storage Media detail will be shown.
Now select a Disk drive to create a New Partition.

Right Click on particular Drive then Click Shrink Volume. 
Now windows will show the free space in particular partition.


Type the disk size to create New Partition in Shrink Window.

Now click on “Shrink”, within few seconds a New Disk will be created.


Still Accessible is not done in New Disk.

Now Right Click on Unallocated Drive. Select New Simple Volume.

Click on Next. Now give a size to the New Partition. (you can choice whole size right now)

Select a Drive letter and Click on Next.

Then select Format Setting ->
File System -> 
NTFS. And keep others as default. (if you need you can change this)


Wednesday 20 February 2013

Hacking


What is Hacking?

stacks_image_51C0A85C-0210-49A5-AF81-26B5547F536B
The word 'hacking' has several meanings, but in the context of ICT, it is normally taken to mean breaking in to a computer system.

Why Do Hackers Hack?

A hacker may break into a system just out of curiosity or for the challenge - can they get through the system’s defences? But, it is more likely that they are breaking in to access data, usually because the data has value.

For example, if a hacker enters your computer and steals financial information such as your credit card number, or the password to your bank account, they could use that information to make purchases.

Can a Computer be Protected from Hacking?

Just as in the real world, there is no guaranteed way to stop someone breaking into a building (you can make it very difficult, but every security system has its weaknesses), there is also no guaranteed way to stop someone breaking into a computer system.

However, you can make it difficult enough so that a hacker moves onand looks for an easier target.


You should:
  • Use strong passwords to protect your user login account
  • Never reveal your login password to anyone else
  • Place a firewall between your computer and any network
  • Disconnect from networks when you are not using them
  • Encrypt any sensitive information (just in case they get in)
  • What is Malware?

    Malware is short for malicious software.

    Malware is the name given to any software that could harm a computer system, interfere with a user's data, or make the computer performactions without the owner's knowledge or permission.

    Basically malware is software that you really don't want to have on your computer!

    People can end up with malware installed on their computer system in a variety of ways:
    • Installing software that seems ok, but has malware hidden inside(know as a 'Trojan Horse').
    • Having their computer hacked, and the software installed by the hacker.
    • Visiting dodgy websites and clicking on infected links
    • The computer being infected by a computer virus


    stacks_image_DB97610D-500A-4DF7-B44D-CE5963AF4E7B
    Some examples of malware:
    • Spyware (spys on you)
    • Adware (pops up adverts all the time)
    • Root kits (allows a hacker full access to your computer)
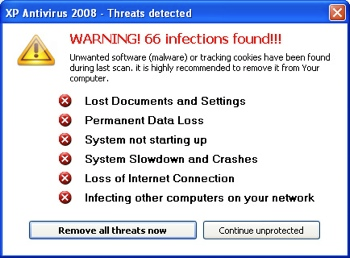
    Ironically, one of the most infamous bits of spyware around is calledAntivirus XP 2008/9.

    This software is advertised as a genuine anti-virus product (for free too!), but if you install it, you've actually installed some malware.

    The software will 'scan' your computer, then tell you that your computer is infected. You'll then be bullied with endless pop-ups into paying a fee to have your computer 'disinfected'.

    In fact the only infection you really have is the fake anti-virus!

    It is estimated that the creators of this malware have made millions of dollars from innocent, gullible computer users.

    It's best to assume that if software is given away for free, there is probably something dodgy about it - Use Google to check any software out before downloading and installing

    So, What is a Computer Virus?

    A computer virus is a piece of software that can 'infect' a computer (install itself) and copy itself to other computers, without the users knowledge or permission.

    Most computer viruses come with some kind of 'payload' - the malwarethat does something to your computer.

    For example, the virus might install some spyware (software that watches what you do with your computer), it might search your computer for credit card information, or it might install software that gives someone remote control of your computer (turning it into a 'zombie').

    How Can a Computer Be Protected from Viruses?

    There are some simple things you can do to help prevent a virus infecting your computer:
    • Install anti-virus software and keep it up-to-date (this is the most important thing you can do!)
    • Install anti-malware software (stops software installing without your knowledge)
    • Never download and install software from the Internet unless you are certain it is from a source you can trust
    • Don’t open e-mail attachments unless you have scanned them (even a file that seems to be a picture can contain a virus)
    • Don’t click links in websites that seem suspicious (if a site is offering prizes / free stuff / etc. be suspicious!)
    • If someone gives you a memory stick or CD-ROM, run a virus scan on it before opening any files.
    • Don’t trust cracked versions of software from file-sharing sites (often these have viruses and other malware added to them - a Trojan horse)

Thursday 7 February 2013

How to Find Free Images for your blog?


free images for blogs


I recently saw a great increase in images' searches. This is because an image is worth thousands words. But when it comes to online business then the same sentence should be changed a little bit and it should be written like this "An original image is worth 500 words". So basically using images in blog posts is a great idea and it increases the chances for getting more and more traffic from everywhere. But using original images (your own) in blog posts is more optimized way to publish images on the internet. Because I've seen now a days people just copy images from Google.com and publish them on their blogs without any prior permission or any changing. So therefore, today I've come up to remove all your confusions about free images and copyright images. 

Google has now more advanced system for images' search and Google's algorithm closely filter the images and the meta data inside them, so now copying images from Google and directly publish them on your blog is not a good practice, however, I'll give you some tips to make them useful.

How Google Indexes Images? 

Google's spiders actually didn't know about the fact within an image, however, now the system has been improved and Google now can identify images from its meta data and other tags. And meta data is actually the data when the image was either captured or created by someone, so you can't easily change that data, that data means the camera or software name by which the image was created/taken, the dimensions of the image, the keywords within the image, the type of the image and more. 

Now if you downloaded the same image from Google.com and uploaded that to your blog then Google won't easily index your image, because it already has that in their index. So what you need is to change the image's data a little bit and make it unique.

Which kind of Images you can use?

Now few questions are here, first of all I would recommend you to only create images by yourself using a photo editor like Photoshop, Illustrator, 3D Xara etc, but if you don't know these software and want to use Google images then make sure, you don't publish those images which are either having copyrights or water-marks within the images. After these all, if the image is not having the water-mark then you are welcome to change that image and use for your blog. 

How to change Images Data? 

Now everything is clear, so you can use free images for your blog. But again, if you downloaded the image and uploaded to your blog as same as it was then that wouldn't be indexed, so you've to change the following things in images: 
  • Change the Name of the image
  • Change the ALT tag of the image
  • Change the Title of the image
  • Re-size the image in Photoshop or Paint [Important]
  • You can also change the content of the image
Having done above changes now the image will be unique one and search engine will also index it, because it's data is now different than that image which was downloaded earlier. 

Conclusion:
This is just my point of view and according to my experience and logic, I've given this idea to you. Also, first try to create your own images, if you can't then use Google's images but at least change them as I told above, and re-sizing the image is must in order to make the image unique. 

Another thing is; that the celebrities' images are free for use such as Cricketers, Footballers, Actresses, actors and so on, but make sure someone has not added the water-marks to the images. Water-marked images can't be used in any case.

Wednesday 6 February 2013

Add Animated Flying Twitter Bird Widget to Blogger

With Twitter's worldwide popularity and with over 200 million users, generating 65 million tweets a day, it has become a must for every web master to use twitter sharing buttons and applications as much on his web as possible. This lets users to easily  tweet our blogs and websites which thereby generates traffic for us in return. 

How to Add Animated Twitter Widget to Blogger?

There are a few steps to do this task. Also you can read Urdu article in Below picture to know about adding this widget to blogger blog.
                                    
  1. First go to your Blogger Dashboard.
  2. Click Template Option.
  3. Click on HTML & Proceed.
  4. Find </body> tag in HTML Coding (Tip: Use CTRL+F).
  5. Insert Below code just before/above </body> tag.
  6. Save Your template and Your done!.<script 
    src='http://bloggerblogwidgets.googlecode.com/files/way2blogging.org-tripleflap.js' type='text/javascript'></script>
    <script type='text/javascript'>
    var twitterAccount = &quot;Niceustaad
    &quot;;
    var tweetThisText = &quot; <data:blog.pageTitle/> : <data:blog.url/> &quot;;
    tripleflapInit();
    </script> 

    Widget Customization

    After inserting this code before </body> tag simply replace your twitter user name with blue color text 
    (Niceustaad)and save your template. You will see a beautiful flying twitter bird on your blog. Stay happy and share this tutorial with everyone in Your circle
     .


Tuesday 5 February 2013

Add Facebook Page into Blogger Blog


facebook page
Here I am going to show you how to create and add the Facebook fan page in to the blogger blog. just follow the simple steps to add Facebook fan page inside blogger blog
1. Create the Facebook page here

2.Open that link and add all the information and add your site details and add fan page picture.

3.Now from the admin penal go to manage and select EDIT PAGE.

facebook page 2
4.Now just click on resources and in resources click on “use social plugins ”


facebook page 3
5. Now just add the LINK of your Facebook page. (I have highlighted the place with yellow color where you need to add your Facebook fan page’s link )
facebook page 6
6. Add your Facebook LINK and set your page like this.


 (?)
 (?)
 (?)
Show Faces (?)
 
 (?)
Stream (?)
 
 (?)
Header (?)
 
Get Code
7. After setting your fan page widget appearance just click on Get Code.

8. Now you can see that you got 2 codes see in the figure. 

facebook page 8
9. Now login to your blogger account and go to dashboard > Design > Edit HTML and find <body> (find it using ctrl + f) 

now just below <body> paste the 1st code and save your template. 

And add the second code where you want to show your Facebook fan page. 

Don’t forget to like our page.